Undoubtedly, the drip irrigation system is one of the most efficient and effective method of irrigation. Whether you’re looking to improve water efficiency, reduce your monthly water bills, or create a more targeted watering solution for specific garden areas, drip irrigation offers compelling advantages over traditional sprinkler heads.
This comprehensive guide will walk you through everything you need to know about integrating drip lines into your current system.
Before jumping into how to install the drip lines to current sprinkler systems, know the benefits of installing the drip system.
Benefits of Installing the Drip System to Sprinkler
Water Conservation and Efficiency
The drip system is known for accurate irrigation, while sprinklers spray water widely where there is no need for any water, which eventually leads to water loss.
Whereas drip lines deliver water directly to the root zone of plants. This targeted approach can reduce water waste by up to 50 percent compared to conventional sprinklers. In regions facing water restrictions or during drought seasons, this efficiency becomes invaluable.
Lower Water Bill
Water savings directly replicate in your monthly water bill.
For homeowners with large garden areas or extensive landscaping, these savings can amount to hundreds of dollars annually.
Flexibility and Control
You don’t need any major twist to irrigate different areas of the landscape.
You can water vegetable gardens, flower beds, shrubs, and trees with precision, adjusting flow rates and watering schedules to match the specific needs of each zone.
Healthier Plants and Landscape
Drip irrigation slowly and consistently irrigates the land, which improves the soil moisture absorption rate, reducing stress on plants and minimizing issues like fungal diseases that thrive in overly wet conditions.
Overall, it improves plant health and makes sure plants receive exactly what they need, when they need it, resulting in lusher, more vibrant growth.
Tools and Materials You’ll Need
Before adding the drip system to the current sprinkler system, make sure to ready the essential tools and materials.
Essential Tools
A punch tool is the essential tool to make necessary connections and install the emitters without cutting the line completely. A regular drill is handy for creating holes in various materials, and you’ll want both a utility knife and sharp scissors for cutting tubing.
A wrench set helps with connecting fittings, and a flashlight or headlamp assists in working in tight spaces or under mulch.
Materials and Supplies
There are various drip tube diameters to choose from ¼-inch and ⁵⁄₈-inch are most common. You’ll also need emitters, which are small devices that control water flow to individual plants. Tee connectors allow you to branch your lines, while end caps seal off tubing ends.
Barbed connectors and compression fittings secure various components together.
Most systems require a pressure regulator to reduce water pressure to appropriate drip line levels.
Step-by-Step Installation Guide
After purchasing the essential tools to install the drip system, here is the step-by-step installation process.
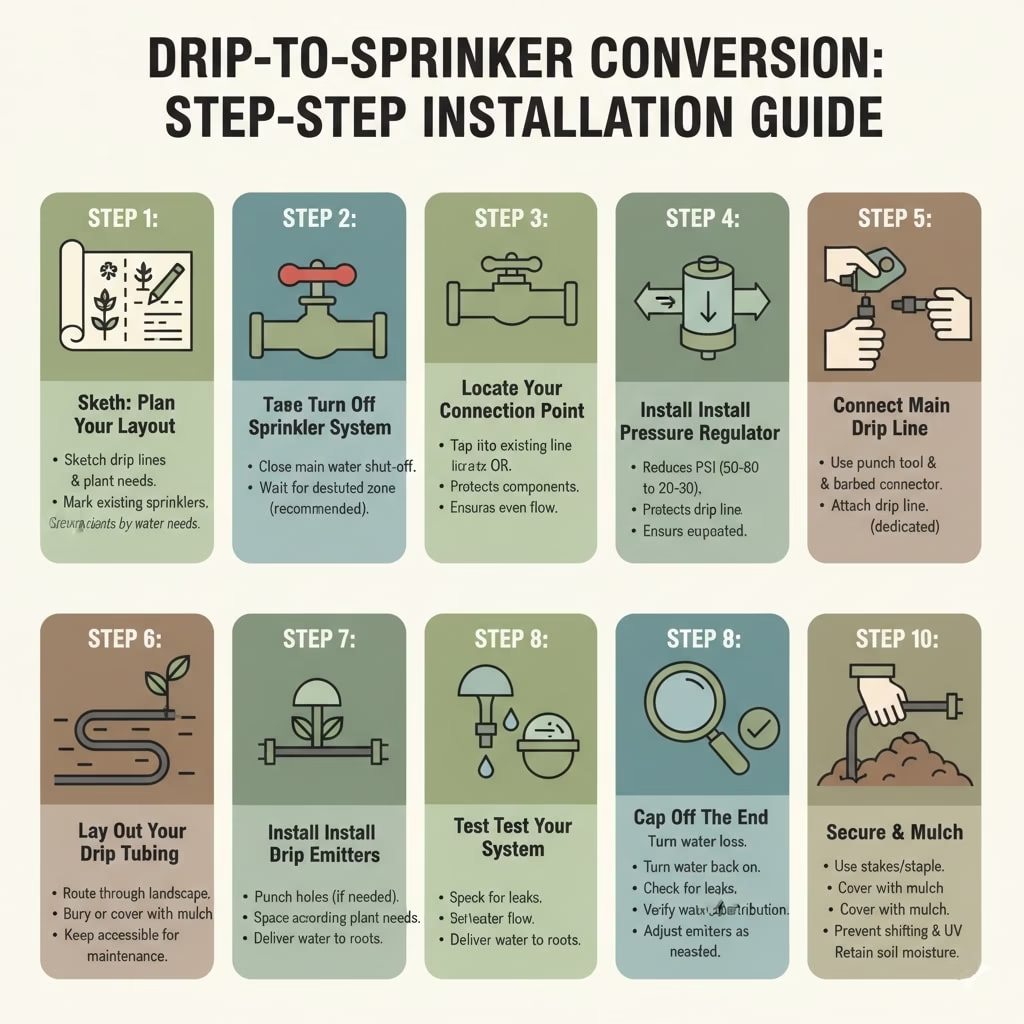
Step 1: Plan Your Layout
Before installing the system, you should plan the drip layout—where you want drip lines, considering plant water needs, soil type, and sun exposure.
Mark the existing sprinkler heads and valve locations on your sketch, then determine the most efficient routing for your new drip lines.
Do make sure plants requiring consistent moisture should be closer to water sources than drought-tolerant varieties.
Step 2: Turn Off Sprinkler System
Before any installation, make sure to turn off the sprinkler system by closing the main water shut-off valve.
After closing the valve, wait a few minutes for remaining pressure in the lines to dissipate. This prevents water from spraying out unexpectedly during installation.
Step 3: Locate Your Connection Point
Decide whether you’ll tap into an existing zone line or create a new dedicated zone.
Tapping into an existing line is simpler for small projects, but creating a new zone gives you independent control over drip irrigation timing and duration.
Most experts recommend a dedicated zone because drip irrigation typically runs for longer periods at lower pressure than sprinklers.
Step 4: Install the Pressure Regulator
This is a crucial step because sprinklers typically operate at 50 to 80 PSI (pounds per square inch), which is double the pressure required in the drip system.
So installing the pressure regulator decreases the water pressure from the sprinkler system and adjusts pressure anywhere around 20 to 30 PSI, suitable for the drip system, extending the life of your drip components and ensuring even water distribution.
Install the regulator at your connection point, following the manufacturer’s instructions.
Step 5: Connect Your Main Drip Line
Make sure to use the punch tools if you’re tapping into an existing line.
Insert a barbed connector through the hole, then attach your main drip line to this connector.
If you’re running a dedicated zone, connect your drip line directly to the zone valve using appropriate fittings.
Step 6: Lay Out Your Drip Tubing
After connecting the main drip line, begin laying it out from the connection point through your landscape.
Bring it to all the areas where you plan to install the drip irrigation.
Bury the tubing slightly below the soil surface or cover it with mulch to protect it from UV damage and keep it out of sight. Leave it accessible enough for future maintenance.
Step 7: Install Emitters
Emitters deliver the water to the plant. To install them, simply make a punch hole (if your system does not have emitters built-in). Make sure to leave space between the emitters according to your plant needs and placement.
Step 8: Cap off the End
This is the necessary tool many times included with the drip system.
The tool helps you prevent water loss. Some systems include flush caps that allow you to periodically remove and rinse out the line to clear any sediment buildup.
Step 9: Test Your System
At last, it is time to check the system installation by turning the water back on and letting the system run.
Check for leaks at connection points and verify that water is flowing to all emitters. Watch for proper water distribution, you should see small droplets forming around each emitter without excessive runoff.
This is your chance to adjust emitter placement or add additional emitters before permanently securing everything in place.
Step 10: Secure and Mulch
Once you’re satisfied with the setup, secure tubing in place with stakes or landscape staples to prevent it from shifting.
Cover exposed sections with mulch, which also helps retain soil moisture. Make sure the tubing won’t interfere with mowing or other landscape maintenance activities.
Common Mistakes To Avoid
After following the above steps to install the drip system, before turning the system on, make sure to avoid these mistakes.
Skipping the Pressure Regulator
As mentioned earlier, drip and sprinkler systems operate under different pressures. Without a pressure regulator, your drip lines will fail prematurely.
High pressure blows out emitters and causes tubing to rupture. This is not an optional component.
Over Watering
Drip means efficiency, but it doesn’t mean once you set the system you forget it.
Overwatering still wastes water and can damage plants through root rot. Monitor your plants and adjust schedules seasonally.
Poor Planning
Taking time to plan your layout prevents costly mistakes and inefficient water distribution. Don’t just randomly place emitters—consider each plant’s water needs and location.
Mixing Sprinkler and Drip Lines on The Same Zone
Sprinklers and drip lines operate at different pressures and flow rates. Running them in the same zone compromises both systems. Use dedicated zones for each type.
Neglecting Maintenance
Ignoring your system leads to problems that become expensive to fix. Spend a few minutes monthly checking your drip lines to catch issues early.
Final Words…
Adding the drip system to the current sprinkler system is an achievable project for most growers to yield significant benefits.
From water conservation and lower bills to healthier plants and greater control, drip irrigation represents a smart upgrade to any landscape watering setup.
The key to success is taking time to plan your layout, investing in quality components like a pressure regulator, and committing to basic maintenance. Start with one zone or area, get comfortable with the system, then expand as desired.
Leave a Reply